Salesforce Lead Processing with Databricks and OpenAI
Introduction
In today’s fast-paced digital landscape, integrating advanced technologies such as Databricks and OpenAI can significantly optimize business processes. What if you could automate the tedious task of lead processing and import data seamlessly into Salesforce? This step-by-step guide will show you how to accomplish this using a combination of Databricks, OpenAI, and Salesforce.
Objective
Our main goal is to demonstrate an efficient workflow for processing leads from a CSV file, cleaning them using OpenAI, and importing them into Salesforce. Even if you’re new to Databricks, this guide will show you how straightforward automating these tasks can be.
Step 1: Setting Up the Environment and Installing Libraries
We’ll need to ensure Databricks is ready to interface with Salesforce and OpenAI. Unfortunately, Databricks doesn’t natively support these connections through notebooks, so Python libraries come to the rescue. You’ll need to install the following:
- Simple Salesforce for Salesforce API interactions
- OpenAI for data cleaning
- Pandas and Request for data manipulation and API calls
Once installed, restart Python to ensure the libraries are updated.
%python
%pip install simple-salesforce pandas requests openai databricks-cli
%python
dbutils.library.restartPython()Step 2: Credential Management with Databricks Secrets
Managing credentials securely is crucial. For this, we’ll utilize Databricks Secrets to store sensitive information such as:
- Salesforce username, password, and security token
- OpenAI API key
- Databricks REST API key
Databricks allows the configuration of these credentials through its UI, which is a secure method and a learning opportunity for handling secrets in Python code.
%python
import requests
import json

# Replace with your Databricks workspace URL and token
DATABRICKS_INSTANCE = 'https://<your databricks instance name here>.cloud.databricks.com'
TOKEN = '<your databricks token here>'

headers = {
    'Authorization': f'Bearer {TOKEN}',
    'Content-Type': 'application/json'
}

# Create a secret scope
data = {
    'scope': 'salesforce'
}

response = requests.post(f'{DATABRICKS_INSTANCE}/api/2.0/secrets/scopes/create', headers=headers, data=json.dumps(data))
print(response.json())

# Store OpenAI API Key
data = {
    'scope': 'salesforce',
    'key': 'openai_api_key',
    'string_value': '<your openai key here>'
}

response = requests.post(f'{DATABRICKS_INSTANCE}/api/2.0/secrets/put', headers=headers, data=json.dumps(data))
print(response.json())

# Store Salesforce Credentials
credentials = {
    'username': '<your username here>',
    'password': '<your password here>',
    'security_token': '<your token here>'
}

for key, value in credentials.items():
    data = {
        'scope': 'salesforce',
        'key': key,
        'string_value': value
    }
    response = requests.post(f'{DATABRICKS_INSTANCE}/api/2.0/secrets/put', headers=headers, data=json.dumps(data))
    print(response.json())
Here’s how to retrieve Databricks Secrets and assign them to variables for future reference
%python
from pyspark.sql import SparkSession
from pyspark.dbutils import DBUtils

spark = SparkSession.builder.getOrCreate()
dbutils = DBUtils(spark)

OPENAI_API_KEY = dbutils.secrets.get("salesforce", "openai_api_key")
SF_USERNAME = dbutils.secrets.get("salesforce", "username")
SF_PASSWORD = dbutils.secrets.get("salesforce", "password")
SF_SECURITY_TOKEN = dbutils.secrets.get("salesforce", "security_token")
Step 3: Preparing the Lead Data
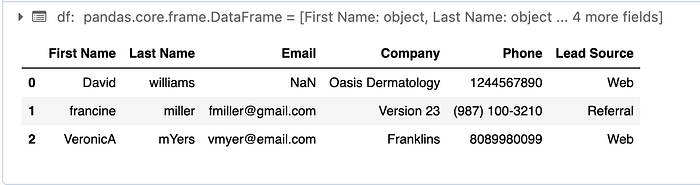
The next step involves uploading the lead data CSV file into Databricks. Modify the path to the CSV file in the notebook and review its contents. For example, we have three leads: David, Francine, and Veronica. The data may be inconsistent, such as missing emails or non-standardized phone numbers.
Here’s how we can Read CSV data into Pandas DataFrame
import pandas as pd

csv_path = "/Volumes/workspace/<your CSV path here>.csv"

# Read CSV into a DataFrame
df = pd.read_csv(csv_path)

# Show the first 5 rows
df.head()
Here are the results:
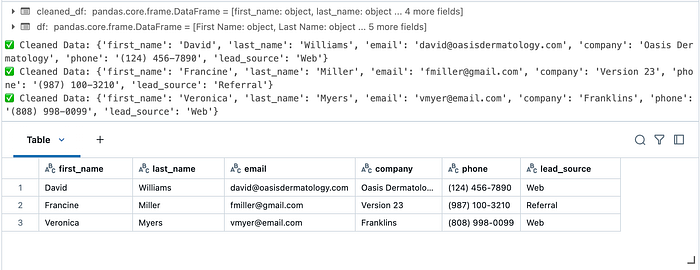
Step 4: Cleaning Data with OpenAI
We will then utilize OpenAI to clean this data. By crafting a prompt, we instruct OpenAI to standardize fields, add missing information, and ensure a consistent format. OpenAI returns a JSON string with the cleaned data, which is ready for import into Salesforce.
import openai
import json

# Set OpenAI API Key
client = openai.OpenAI(api_key=OPENAI_API_KEY)

def clean_lead_data(lead):
    """Uses OpenAI to clean lead data before importing into Salesforce."""

    prompt = f"""
    You are an AI assistant that processes and cleans lead data before inserting into Salesforce.
    Given the following lead record, correct any missing or incorrectly formatted fields:

    {json.dumps(lead)}

    - Ensure 'first_name' and 'last_name' are capitalized correctly.
    - If 'email' is missing, infer it using the company domain.
    - Standardize 'phone' numbers to (XXX) XXX-XXXX format.
    - Ensure 'lead_source' is one of ['Web', 'Referral', 'Event', 'Cold Call', 'Other'].

    Return only a valid JSON object with no additional text.
    """

    response = client.chat.completions.create(
        model="gpt-4",
        messages=[
            {"role": "system", "content": "You are an AI that returns only valid JSON output."},
            {"role": "user", "content": prompt}
        ]
    )

    try:
        # Extract response text
        response_text = response.choices[0].message.content.strip()

        # Parse JSON output
        cleaned_data = json.loads(response_text)

        print("✅ Cleaned Data:", cleaned_data)
        return cleaned_data

    except json.JSONDecodeError:
        print("❌ Error: OpenAI returned invalid JSON!")
        print("Raw Response:", response_text)
        return {}

# Example lead record
sample_lead = {
    "first_name": "john",
    "last_name": "doe",
    "email": "",
    "phone": "1234567890",
    "lead_source": "web"
}

# Print the cleaned lead data
print(clean_lead_data(sample_lead))
Here’s how we can apply OpenAI cleaning logic to all CSV records
import pandas as pd

df = pd.read_csv('/Volumes/workspace/<your CSV path here>.csv')

# Apply OpenAI data cleaning to all leads
df["cleaned_leads"] = df.apply(lambda x: clean_lead_data(x.to_dict()), axis=1)

# Convert cleaned leads back to DataFrame format
cleaned_df = pd.DataFrame(df["cleaned_leads"].tolist())

# Show cleaned leads
display(cleaned_df.head())
Here are the results:
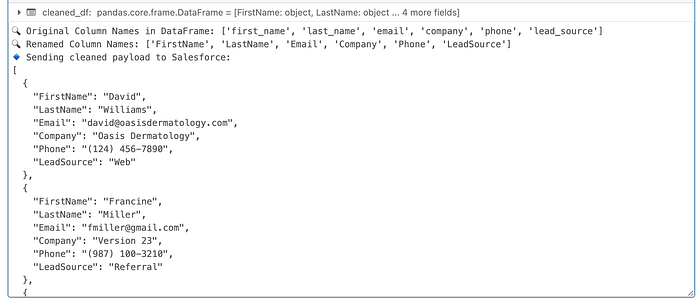
Step 5: Importing Leads into Salesforce
Finally, with clean data, the next step is connecting to Salesforce. Using Simple Salesforce, authenticate with your credentials and prepare the data for import. Map fields from your CSV to Salesforce and execute the batch operation using Salesforce’s bulk API. This method ensures quick processing of multiple records.
First, we’ll log in to Salesforce
from simple_salesforce import Salesforce

# Authenticate
sf = Salesforce(username=SF_USERNAME, password=SF_PASSWORD, security_token=SF_SECURITY_TOKEN)

# Test connection
print(sf)
Then, we’ll use the Bulk API to import leads into Salesforce
import requests
import json
import numpy as np

# Salesforce Bulk API URL
bulk_url = f"https://{sf.sf_instance}/services/data/v60.0/composite/sobjects"

# Step 1: Print current column names for debugging
print("🔍 Original Column Names in DataFrame:", cleaned_df.columns.tolist())

# Step 2: Standardize column names (remove spaces, make lowercase)
cleaned_df.columns = cleaned_df.columns.str.strip().str.casefold()

# Step 3: Define the correct mapping
column_mapping = {
    "first_name": "FirstName",
    "last_name": "LastName",
    "email": "Email",
    "company": "Company",
    "lead_source": "LeadSource",
    "phone": "Phone"
}

# Step 4: Rename columns using casefolded names
cleaned_df = cleaned_df.rename(columns=column_mapping)

# Step 5: Print renamed columns for debugging
print("🔍 Renamed Column Names:", cleaned_df.columns.tolist())

# Step 6: Ensure DataFrame contains only the required fields
valid_salesforce_fields = ["FirstName", "LastName", "Email", "Company", "Phone", "LeadSource"]

# Step 7: Check for missing columns before selecting
missing_cols = [col for col in valid_salesforce_fields if col not in cleaned_df.columns]
if missing_cols:
    print(f"❌ Missing columns after renaming: {missing_cols}")
    raise KeyError(f"Missing columns: {missing_cols}")

# Step 8: Keep only the valid fields
cleaned_df = cleaned_df[valid_salesforce_fields]

# Step 9: Replace NaN with None
cleaned_leads_list = cleaned_df.replace({np.nan: None}).to_dict(orient="records")

# Step 10: Split into batches
batch_size = 200
lead_batches = [cleaned_leads_list[i:i + batch_size] for i in range(0, len(cleaned_leads_list), batch_size)]

def insert_leads(batch):
    headers = {
        "Content-Type": "application/json",
        "Authorization": f"Bearer {sf.session_id}"
    }

    # Ensure JSON has no NaN values and valid field names
    payload = json.dumps({
        "records": [{"attributes": {"type": "Lead"}, **lead} for lead in batch]
    })

    # Log payload for debugging
    print("🔹 Sending cleaned payload to Salesforce:")
    print(json.dumps(batch, indent=2))

    response = requests.post(bulk_url, headers=headers, data=payload)

    if response.status_code != 200:
        print(f"❌ Error: {response.status_code} - {response.text}")
    else:
        print("✅ Successfully inserted leads")

# Example usage
for batch in lead_batches:
    insert_leads(batch)
Here are the results:
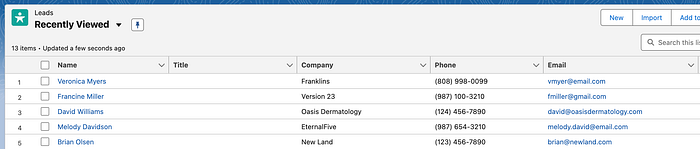
Post-Import Verification and Tools
Once completed, verify the data by querying Salesforce directly or refreshing the platform to see newly imported records like David Williams, Francine, and Veronica. If issues arise, remember that Databricks offers an assistant to help debug and improve code.
To see the most recent lead records added to Salesforce, you can run a SOQL query:
query = "SELECT Id, FirstName, LastName, Email FROM Lead ORDER BY CreatedDate DESC LIMIT 10"
leads = sf.query(query)
print(leads)
You can also log in to Salesforce.
Conclusion
By following this guide, you can simplify the integration and processing of leads using Databricks and OpenAI. These technologies streamline the process and enhance data quality before reaching Salesforce. We encourage you to try this setup and explore other capabilities of Databricks. If there are additional topics you’d like to see covered, feel free to reach out.
What’s Next?
In upcoming posts, we’ll explore additional features within Databricks and advanced integrations. These powerful tools can help you expand your knowledge and unlock more possibilities.
Why Wait? Get Started Today!
- Stay Current with Databricks.com: https://www.databricks.com/
- Sign Up for Databricks Free Trial:
- Databricks Documentation: https://docs.databricks.com/en/index.html
- Databricks Trained & Certified: https://www.databricks.com/learn/training/home